This page gives an overview of the generation, storage battery, Air Source Heat Pump (ASHP) and EV charging equipment we have installed and explains how we use it to save energy, reduce emissions and slash costs.
Solar Panels & Associated Equipment
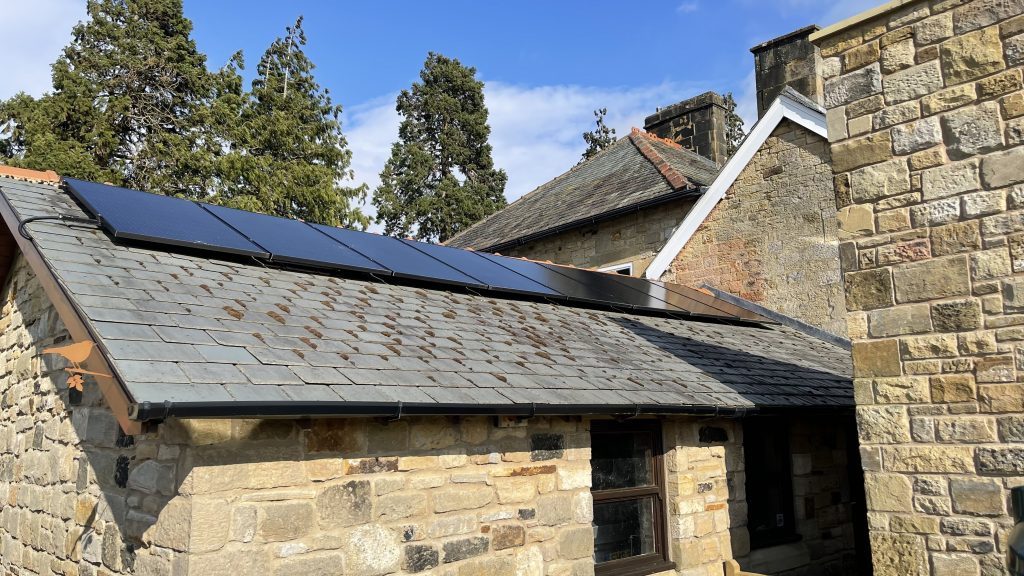
We purchased 32 solar panels and initially installed 24 of them as shown in the picture below: 12 on the house, 4 on the office and 8 on the garage. The picture below shows the set up. The garage roof is angled (pitched) at 25 degrees, the other two at 45 degrees.

The photo was taken in the late morning, in early-October, with the early sun roughly behind the photographer’s back. As you can see, the two arrays on the house and office roofs are in full sun: the last remaining shadows of tree branches are just moving off the bottom right of the four panels on the office roof.
At this time of day, in autumn, the office shades five of the eight panels on the garage roof. As the sun rises higher in the sky, all three of the arrays come into full, unshaded, direct line-of-sight to the sun. In the late afternoon, the garage roof catches the sun full on, but the office increasingly shades the main house roof, mostly affecting the panels closest to the chimney.
In 2021 the remaining 8 panels were installed. As shown in the picture below, they form the roof of a studio we have built for Anne’s ceramics business – it’s on the left with the built-in greenhouse. Please note: we had planned construction to start in March 2020, but COVID lockdowns delayed work by a year. As a result, the detailed performance and financial data we reported here covering 2019 – 2020 included only 75% of the total generation capacity. With the solar panels now 100% complete and with our heat pump system installed, we’ve started a fresh data record from 01 January 2022.
There’s a more detailed update on our 2021 solar panel and ASHP upgrade here.

As the photo shows, the studio roof stands at 90 degrees to the other three pitches, and faces roughly South East. It therefore catches more of the morning sun, compensating for the garage roof being partially shaded by the office during this early part of the day.
We designed the monopitch roof and high back wall of the studio with the sun’s West to East arc through the sky in mind. Although the buildings are in close proximity, there is no time of day during the solar productive months when the studio shades the solar array on the garage roof behind it. You can see the triangular shadow of the studio in this close-up image, but it always remains below the panels as the sun moves through the sky.
Solar array schematic overview
Solar panels are measured in Watt peak generation capacity (Wp). In our case, we opted for relatively high-efficiency 330Wp panels, as shown in the schematic below.
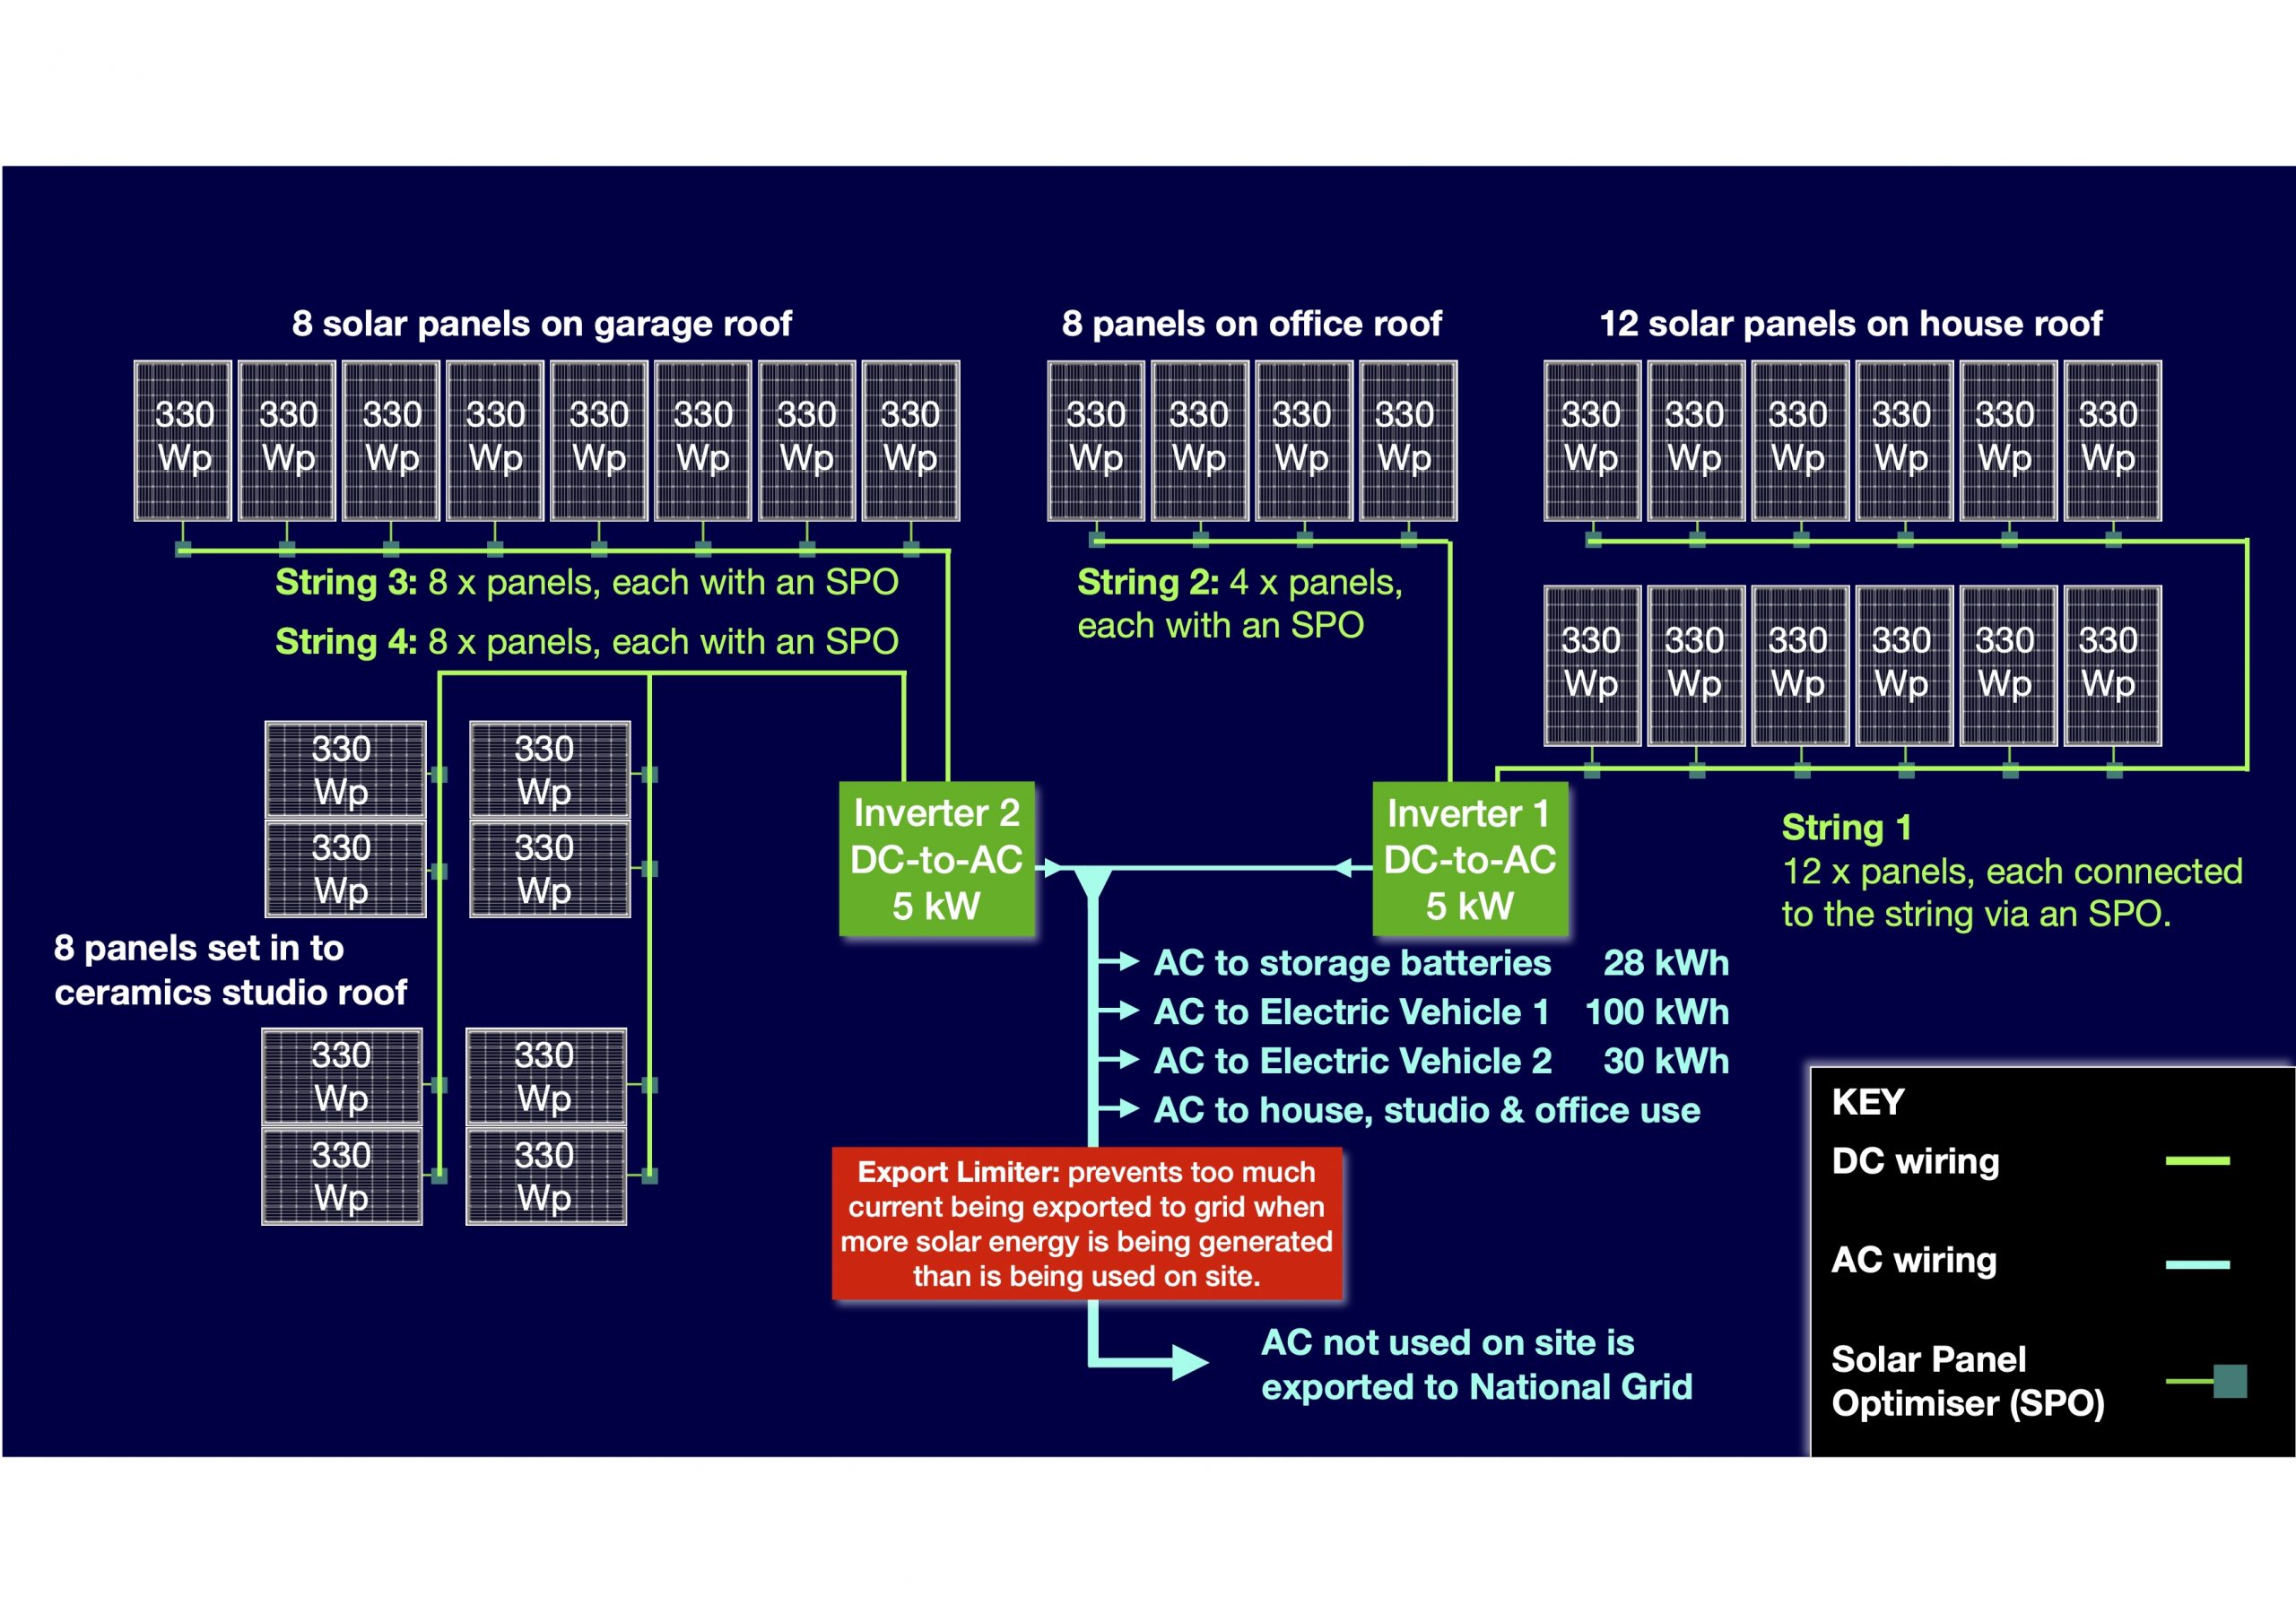
The panels convert solar energy into Direct Current (DC). The panels are then connected in ‘strings’ to an inverter which transforms DC into Alternating Current (AC), which can be used in the house and exported to the National Grid, if it’s not consumed on site.
Inverters
As the schematic shows, our set up involves String 1 connecting 12 panels on the main house roof to Inverter 1, which is installed in the house loft. String 2 connects the 4 panels on the office roof also to that same Inverter.
Inverter 2 collects the generation from two strings: String 3 connecting the 8 panels on the garage roof and String 4, the 8 panels on the studio roof.
So each inverter handles 16 panels. 16 x 330 Wp means that the 16 panels connected to each inverted could in total produce 5,280 Watts under ideal conditions, which is expressed 5.28 kilowatts at peak (kWp) in solar industry terminology. Given that there will only be a limited time each summer when the system is at its absolute peak, we specified each inverter for a maximum capacity of 5kW. In theory, this would mean that on a perfectly sunny afternoon all 32 panels could be producing a total of 10.56 kW for an hour or so, but the two inverters would be ‘maxxed out’ at a total of 10kW, therefore we’d be ‘wasting’ half a kilowatt. But the inverters have a margin of about 10% built in, so they’ll each happily go to 5.5 kWh, meaning that our inverters will easily handle the theoretical maximum production of our panels.
Solar Panel Optimisers
When configuring the panels and inverters, we discovered one exceptionally important fact. If your installer simply connects each string directly to the inverter, the whole string will only produce the power of the weakest panel on that string. For example, if only one of the main roof panels’ output were reduced by 90% – say by shading from a tree branch as the sun moves across the sky – then all the remaining eleven panels would also be reduced by 90%, even if they were in full sunlight, not shaded by the branch. The solution is to connect each panel to the string using a Solar Panel Optimiser, which allows every panel to produce at its maximum efficiency, regardless of what any other panel on the string is doing. The optimisers are represented by the 32 small green squares next to each panel in the schematic.
Grid Export Limiter
Another vital issue is that your local Distribution Network Organisation (DNO), the companies which run the local electricity grid networks – not the utility companies which bill you for electricity – impose a limit on power that you can export to the grid. This is for safety reasons, so that anybody working on the transmission lines isn’t electrocuted by energy coming into the system from microgeneration sites the DNO doesn’t know about. Your solar installer will submit an application on your behalf when you order your system. There’s a ‘fast track’ procedure, which allows small systems up to 3.89 kWp (roughly 12 panels) to be connected without any particular hassle.
If, as in our case, you’re building a bigger system, you have basically two choices. Either follow the full application process to agree a higher limit with your local DNO, who may insist on upgrading your supply to handle the additional load. Or, much simpler, include a Grid Export Limiter in your system design, to prevent more than 3.89 kWp ever being exported to the grid.
We went for the Grid Export Limiter option (shown in the red box on the schematic). This works fine for us, because our system design goal is to attempt never to export a single electron to the grid, but to use everything our solar panels produce locally for charging our domestic batteries, fuelling our two EVs, and running the heat pump. The limiter is there to cover those exceptionally rare occasions, most likely in high summer, when all four batteries (158 kWh in total!) are full, both cars aren’t on site, the heating isn’t running, and the house is consuming only a couple of hundred watts. In this very rare case, the limiter will ‘throttle back’ the inverters, to prevent too much power reaching the grid. It’s an extra piece of kit, but for us it was well worth it, to avoid the hassle of a full DNO application.
Energy storage – Tesla Powerwall
Having the ability to store energy is critically important. If we didn’t have ‘somewhere to put’ the energy from our solar panels that isn’t immediately required for lights, kettles, washing machines, etc., at the precise moment it is generated, it would just seep out to the grid. That’s great for the electricity companies, who pay next to nothing for all these lovely ‘escaped’ kilowatts under the Smart Export Guarantee. But it’s pretty rubbish from the point of view of a householder.
With in this in mind, it was a bit of a no-brainer for us to install Tesla Powerwall batteries. Initially, we ran only one unit, when we had only 24 solar panels in use. When we completed the 32 panel array and installed the heat pump in 2021, we ‘doubled up’ to two Powerwalls, and in 2023 we added a third unit. This gives us a total of 42 kWh of storage capacity, which enables us not only to store surplus zero-cost solar energy, but also to ‘time shift’ cheap off-peak grid imports. We then use the stored energy to power our home, and to drive the electrically power heat pump which provides heating and hot water. Operating the batteries in this manner reduces our requirement for grid energy during peak periods, when electricity is expensive. In summer, when the sun shines for longer and little/no heating is needed, whole weeks often go by with zero peak rate electricity imports from the grid.
To explain in a little more depth, the Tesla Powerwall is a 14 kWh static battery, using essentially the same technology as the batteries in Tesla cars. It can charge and discharge at a rate of 5 kW. Therefore, if the sun is shining brightly, and our 32 solar panels are generating at their 10 kW approximate peak capacity, it would take just under 2.5 hours to fill both Powerwalls from completely empty to 100%.
When there is only weak sunshine, the Powerwall dynamically reduces its charge rate to use only the surplus amount of solar energy – over and above what the house and/or heat pump is consuming at any given moment. It constantly varies its charging rate in realtime to use only whatever surplus solar power is available. So, as clouds drift across the sky, the Powerwall charge rate goes up and down dynamically in response to The Amount Of Solar Generation minus The Amount Of Consumption to ensure that every available watt of surplus energy is stored in the battery, and none ‘gifted’ outwards to the grid. Conversely, it never uses imported peak-rate grid electricity to charge.
We also use the Tesla app to set the Powerwall to charge between every night, to take advantage of super-cheap off peak electricity supplied under our Octopus tariff (20:30 to 01:30 currently on the ‘Go Faster’ tariff in our case).
As mentioned above, we initially had only one Tesla Powerwall, prior to the heat pump being installed. With this single battery set up, we observed the following typical pattern:
- At the start of the overnight off-peak period for grid imports, the Powerwall will intelligently adopt the lowest possible charge rate to be 100% full by the end of the low-cost window.
- It will then discharge as required to meet the domestic electricity load throughout the day.
- It will be topped up by solar during the sunny part of the day. This will then generally ‘see it through’ the evening requirement from the house, until the next cheap rate window starts.
- On this cycle, our entire daily domestic consumption often cost only around 70p in the spring and autumn months, as a result of using the Powerwall to store 14 kWh of cheap grid electricity (which cost us 5.0p/kWh at the time) plus the solar ‘top up’, which cost 0p.
On summer days, more solar energy is stored in the Powerwall battery. This, coupled with the shorter evenings, means that the battery is often still part full at 20:30, and thus requires less off-peak grid import to reach 100% full by 01:30. With the single Powerwall setup, this reduced, and often eliminated, even the tiny 70p daily cost. On sunny summer days we often paid Octopus only the 25p per day standing charge.
The image below shows the equipment installed in our garage, including:-
- Our first Tesla Powerwall (the big white rectangle). The second battery we have since installed also sits in the garage,.
- Our zappi smart EV charger, which is explained in the next section.
- Our SolarEdge inverter (Inverter 2 in the schematic). This is the white box to the left of the zappi, which converts the DC power generated by the solar panels on the garage and studio roofs into AC power usable around the house, as explained above.
Curiously, AC is converted back into DC when it is used for charging the Powerwall or electric car batteries – this is just a fact of life wiring-wise, don’t worry about it, your installer will be perfectly familiar with which bits of your system are DC and which are AC. The conversion happens inside the Powerwall and the cars.
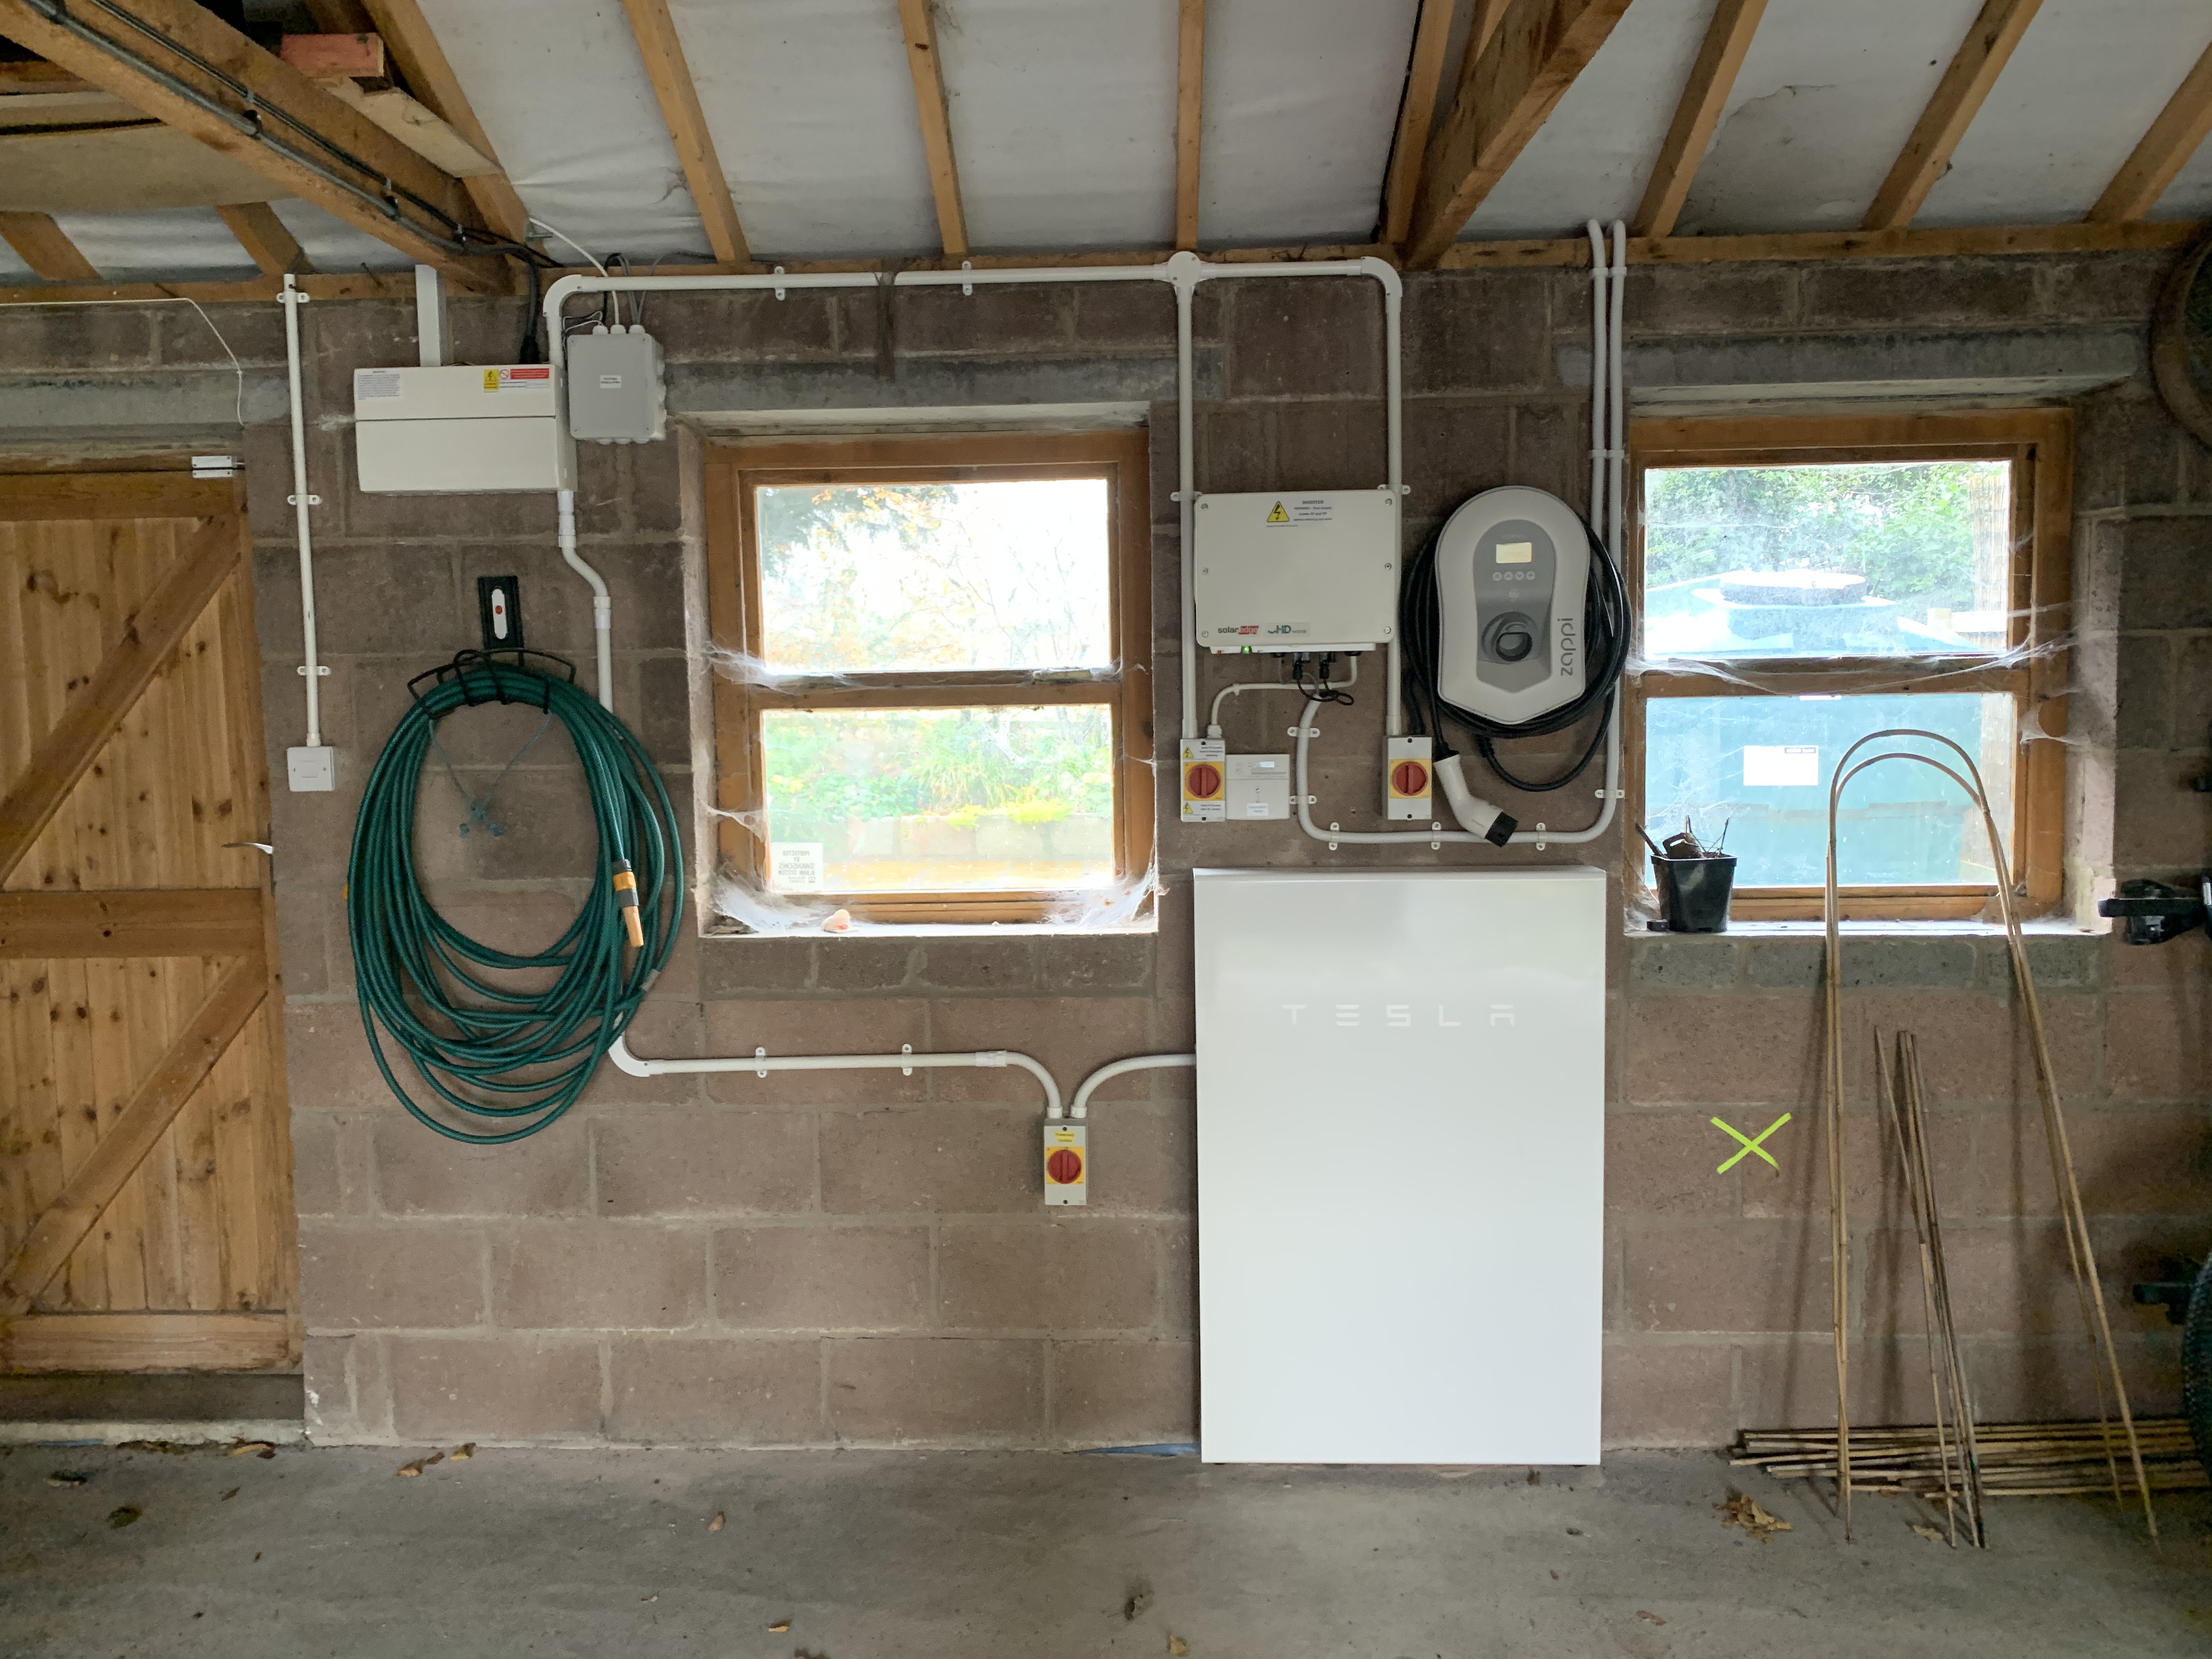
The little square grey box above the garden hose reel is the Grid Export Limiter, and the oblong white box next to it is the fuse board protecting all this equipment (and Anne’s pottery kiln, which is on the same sub-main).
The tiny white rectangle under the inverter is the Generation meter, which records how many kWh the 16 solar panels attached to this inverter have produced. There’s another meter attached to Inverter 1, which manages the 16 panels on the house and office roofs.
As you can see, each piece of equipment is protected with its own isolation switch. This permits each individual unit to be individually switched out if maintenance work is ever required, avoiding the need to shut down the whole system.
Air Source Heat Pump – Evergreen Energy
Using the 2019-20 data we had accumulated with our initial 24-panel solar array and single Powerwall battery, we did a detailed Cost:Benefit analysis in 2021, to see whether it would be viable to integrate a major new element into the evolving Smart Energy solution for our home.
In short, we had already done the easy bit by switching to EVs, but we knew that if we really wanted to make a difference we’d have to decarbonise our home’s heating system. The stark fact is that oil and gas boilers for central heating and hot water produce up to 85% of typical UK household greenhouse gas emissions. Solving that problem is probably the biggest single challenge the UK faces if we are to achieve Net Zero Carbon by 2050.
It was the carbon that led us to take the really big decision to scrap our oil fired central heating and replace it with an Air Source Heat Pump (ASHP) system. We were burning an average of 4,967 litres of heating oil a year. Each litre of heating oil burned emits 2.96 kg of CO2. So we could eliminate 14.70 tonnes of emissions every year, if we took the plunge and system. To give a sense of scale we had eliminated only around 6 tonnes per year by generating solar power, exclusively driving EVs, and importing our remaining grid electricity requirement exclusively from a 100% renewable supplier.
Whilst the carbon case was exceptionally strong, it was the financial projections of the Cost:Benefit analysis which really made our minds up. The calculations showed that if we committed to the ASHP, used as much ‘home brew’ solar and off-peak grid electricity to drive it as possible, whilst storing cheap energy for use at times when grid energy is expensive, we could save potentially thousands of pounds a year in operating costs, as well as doing our bit to save the planet.
There’s more detail on our 2021 upgrade here, which includes the final solar panels, in addition to heat pump central heating and domestic hot water system.
When we committed to the heat pump, we also ‘bit the bullet’ and decided to add the second Tesla Powerwall and undertake some major work to upgrade our incoming grid supply from single to polyphase. The polyphase supply enables us to safely cover the occasional ‘heavy juice’ day, when the kettle’s on, the washing machine’s on a boil wash, the heat pump is going like the clappers on a winter’s day, Anne’s electric pottery kiln is firing up, two Powerwall batteries are sucking in electrons from the grid, all the lights are on, and both EVs are charging up. If we didn’t upgrade the supply we’d have been at risk of blowing the fuse on a single phase supply.
Heat pumps are essentially very simple. They’re basically fridges in reverse. The process is well summarised in this Which magazine article.
- The air source heat pump absorbs heat from the outside air into a liquid refrigerant at a low temperature.
- Using electricity, the pump compresses the liquid to increase its temperature. It then condenses back into a liquid to release its stored heat.
- Heat is sent to your radiators or underfloor heating. The remainder can be stored in your hot water cylinder.
- You can use your stored hot water for showers, baths and taps.
- The pump uses electricity to run, but it should use less electrical energy than the heat it produces. This makes them an energy-efficient way to warm your home.
- Air source heat pumps work even if the temperature is well below zero.
Of course, all this upgrading cost money, on top of kit we had already installed and the electric cars we had already bought. But we took the conscious decision to commit to the capital cost, because the operating cost savings will pay back our investment several times over. This page has an analysis of the upfront Pain versus Gain over time analysis.
EV Charging – myenergi zappi
One of the cleverest bits of kit on the market is manufactured by myenergi ltd, and it very helpfully aligns perfectly with what we are seeking to achieve. This is the ‘zappi’ electric vehicle (EV) charger. Unlike a ‘bog standard’ charger, zappi is smart. In its ECO+ Mode, zappi constantly monitors the amount of energy being produced by your solar panels and then routes only the excess to your EV. So, let’s say:
- your solar is producing 5.2 kW at a given moment;
- your house is consuming 0.5 kW at that same moment;
- zappi will route only the ‘spare’ 4.7 kW to your EV.
- This means that you can super-efficiently consume every last electron of your locally-produced energy for your own local consumption;
- and means that you’re not ‘gifting’ free energy to the grid;
- and means that local consumption means that the distribution grid doesn’t have to take in the energy you have generated, and then store it and/or redistribute it to other consumers. This welcome side-effect will become hugely significant when millions of households make the switch to local generation plus local consumption for the bulk of their energy needs. Depending on the rate of uptake, potentially billions of pounds could be saved if smart charging reduces the need for new power stations and grid strengthening.
Highly intelligently, zappi constantly monitors the varying rates of solar (or any other micro generation) production and constantly varies the rate of charge to the car, to use only the excess being produced at any given moment.
If the available excess power drops below 1.5 kW, zappi will temporarily suspend charging in ECO+ Mode, because 1.5 kW is the minimum rate of charge specified in the EV charging standards used by the car manufacturers. When that [insert expletive here] cloud blows away, zappi will restart the charge.
The zappi unit is also smart enough to ‘play nice’ with the Powerwall (or other domestic storage battery). Using the on-screen controls on the zappi itself, you can set its ECO+ Mode to “avoid drain”, so that it won’t counterproductively use stored domestic battery energy to charge the car battery. In practice, this means that:
- either zappi will wait until the Powerwall battery is full before starting to charge an EV;
- or zappi will use any available power above the 5 kW maximum the Powerwall can accept to charge the EV (for example, solar is producing 9 kW, 5kW goes into Powerwall, zappi routes the 4kW surplus into the EV);
- and zappi will not draw stored energy from the Powerwall to charge the EV. So, if your Powerwall is at 100%, your solar is producing 4kW, and your house is using 1kW, zappi will put only the surplus 3kW into the car, thereby saving your Powerwall energy for domestic use after the sun has gone down
Needless to say, beyond the exceptionally useful ECO+ Mode, zappi has several other operating modes, which allow for very flexible use. The full range of modes is as follows:
- ECO+ Charge power is continuously adjusted in response to changes in generation or power consumption elsewhere in the home. Charging will pause if there is insufficient solar power, continuing only when there is surplus free power available.
- ECO Charge power is continuously adjusted in response to changes in generation or power consumption elsewhere in the home. Unlike in ECO+, charging will continue until the vehicle is fully charged, even if some power is drawn from the grid, e.g. when solar is not generating enough to cover the minimum 1.5 kW required to charge an EV.
- FAST In this mode, the vehicle will be charged at maximum power. This is just like an ordinary ‘dumb’ charging point, which can only charge at maximum rate.
- TIMED BOOST Using the myenergi app, or the menus on the unit itself, you can programme zappi to charge an EV at zappi’s maximum possible rate of charge (just like FAST mode) between a specified start time and a specified stop time. TIMED BOOST is a vital function for us; further detail below.
- SMART BOOST You specify a certain amount of kWh to be charged to the EV battery by a certain time. The zappi unit will work out the latest possible time it can start charging the car to deliver the specified kWh and ensure they are delivered by the required time.
- BOOST Regardless of whatever mode zappi happens to be in, BOOST will simply immediately start charging the car at the maximum possible rate (just like Fast mode). This is useful if you need a charge quickly between trips.
The TIMED BOOST function is exceptionally useful. We use it to tell zappi to fill up the Tesla battery at the maximum rate possible during the dirt-cheap Octopus off peak period every night. If, say, your tariff has a four hour off-peak window, and assuming you’re on UK-typical single phase domestic grid supply (which allows 7.4 kW charging) you could put 29.6 kWh of very cheap electricity into the car (7.4 kW x 4 hours). Depending on your EV and your driving style, you’ll get somewhere between 70 and 100 miles out of those 29.6 kWh.
- Please note: a zappi connected to a 3-phase supply is capable of supplying 22 kW. This will put around 56 to 62 miles every hour into any EV capable of accepting this higher rate of AC charging. Most UK domestic premises do not have 3-phase grid supplies, but many workplaces do. It’s definitely worth considering a 3-phase unit if your grid supply is suitable and your EV can handle higher rates of charging on AC.
- Please also note that Tesla vehicles are capable of accepting vastly higher rates of charge when connected to Tesla’s own (DC) Superchargers, which are strategically located around the country to facilitate long road trips. Model X and Model S charging peaks at over 400 miles per hour. The newer Model 3 and Model Y have a peak charging rate at over 1,000 miles per hour on the latest 250kW Superchargers, which Tesla now instal as standard at all new locations. Some other manufacturers (such as Porsche and Lucid) also produce EVs which are capable of charging extremely rapidly, but they don’t have their own dedicated charging infrastructure, so drivers of those marques are dependent on the public charging infrastructure, which so far offers only very few ultra-rapid chargepoints.
The TIMED BOOST rate of charge equates to around 18 miles for every hour in our Model X. So, in our five cheapo ‘Octopus hours’, the Tesla gets ‘fuel’ for around 90 miles driving, which is more than enough to ‘refuel’ after a typical day’s local use.
On our current Octopus ‘Go Faster’ tariff the total cost of those 96 miles is £2.03 (37 kWh x 5.5p per kWh).
To get a comparison, let’s assume 35mpg for a very high performance internal combustion car: although the Tesla will still simply pulverise from 0-60. In the petrol car, the 90 miles we can charge every night with dirt cheap electricity, would require 2.57 gallons = 11.67 litres of fuel. Assuming petrol at £1.67/litre, a petrol car would cost £19.49 in fuel for the same 90 miles.
Over a typical 12,000 miles annual mileage, using 5p/kWh off-peak energy to charge a Tesla battery will cost £270. Petrol in a 35mpg car will cost £2,599.
Unless you really, really, want to stand in the middle of the road setting fire to fifty pound notes, you may find the following links helpful. See the Links page for benefits disclosure.